How To Feather Photoshop

Okay, let’s be real: Photoshop can be terrifying. It’s like standing in front of a spaceship control panel and being told to “just fly it, no big deal.” But today, we’re tackl...
Okay, let’s be real: Photoshop can be terrifying. It’s like standing in front of a spaceship control panel and being told to “just fly it, no big deal.” But today, we’re tackling one tiny, magical button that will make you feel like a digital wizard: Feather. Think of it as the “blur the edges” fairy godmother.
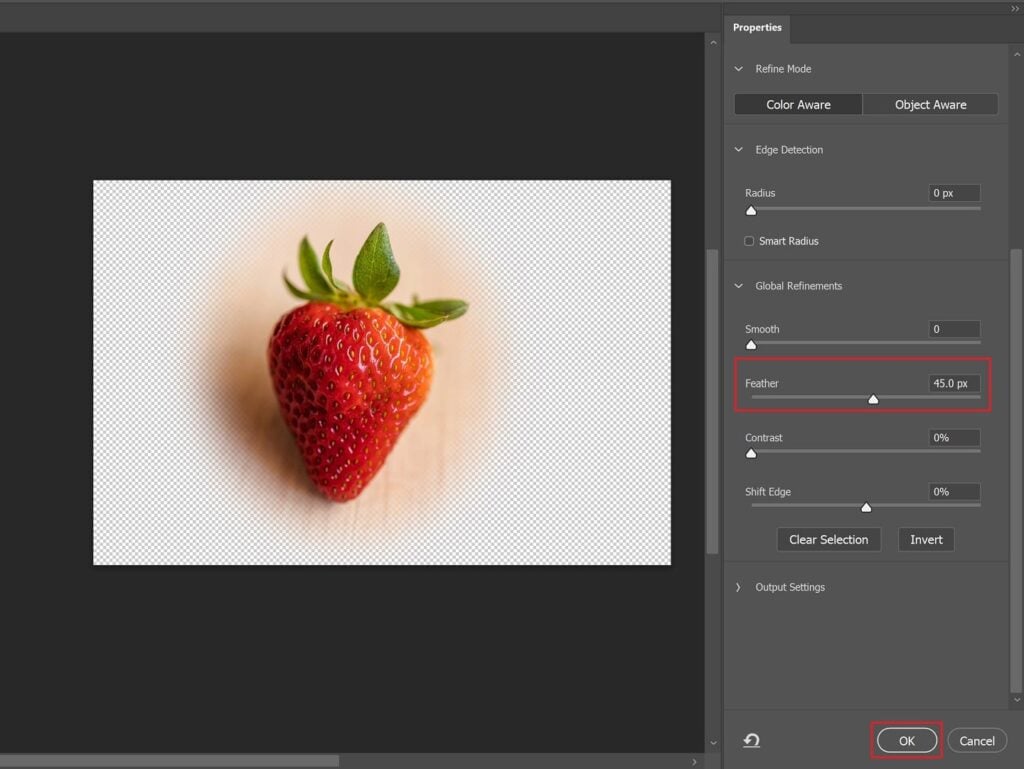
So, what even is feathering? In plain English, it’s adding a soft, gradual fade to the edges of a selection. Instead of a harsh, cut-out-with-scissors look, you get a dreamy, cloud-like border. It’s the difference between a paper doll and a ghost.
Why Should You Care About Feathering?
Because life is too short for jagged edges. If you’ve ever tried to cut someone out of a photo and they ended up looking like a cardboard standee, feathering is your new best friend. It’s the secret sauce that makes composites look real.
Must Read
Think about it: nothing in the real world has perfectly sharp edges. Not your hair, not a fluffy dog, not even that slice of pizza you’re about to eat. Feathering is Photoshop’s way of saying, “Hey, let’s be natural about this.”
You want to put your friend’s face on a baby’s body? Feather it. You want to make a glowing light effect? Feather it. You want to feel like a professional? You guessed it—feather it.
The Two Main Ways to Feather (No Stress)
Don’t worry, I’m not going to throw 47 buttons at you. There are really only two ways to do this, and both are easier than folding a fitted sheet. (Okay, maybe not that easy, but close.)
Method 1: The “Do It Before” Way (My Favorite)
First, grab your Marquee Tool (the square or circle guy) or the Lasso Tool. Before you even make a selection, look up at the top of the screen. See that little box labeled “Feather”? It probably says “0 px.” Change that number to something like 10, 20, or 50 depending on how soft you want it.
Now, drag out your selection. Poof! The corners are already soft. It’s like ordering your coffee with the milk already in it. Pro tip: start small, like 5 pixels, because you can always undo. Or don’t start small—I’m not your pixel-parent.
Method 2: The “Oops, I Forgot” Way (Totally Fine)
This is for when you’ve already made a selection and it looks like a robot sneezed on your photo. No shame—we’ve all been there. Go up to the top menu and click Select > Modify > Feather. Or, if you’re fancy, just hit Shift + F6 on your keyboard. (See? You’re already becoming a keyboard ninja.)
 How To Feather Edges In Photoshop at Nathaniel Ackerman blog
A tiny box will pop up asking for a radius. Type in a number—maybe 15 or 30 if you want a dramatic, glowy edge. Hit OK, and your harsh selection is now a gentle, blushing cloud. Ahhh, much better.
A Few Extra Tips to Keep You From Crying
Don't overdo it. A feather radius of 250 pixels on a small photo will turn your subject into a ghost. Unless you want a ghost, in which case, go wild. But for real, match the feather size to your image resolution.
Also, check your selection in Quick Mask mode. Press the Q key on your keyboard. Your image turns pinkish-red except for your selection. The blurry edges you see? That’s your feather in action. Press Q again to go back. It’s like X-ray vision, but for Photoshop nerds.
And here’s a silly but true thing: if you can’t see the feather effect, you probably need to zoom in. Feathering is subtle. It’s not a disco light; it’s a gentle breeze. Hug your pixel edges with love.
When to Get Fancy with Your Feather
Feathering isn’t just for cutting out people from vacations. Try it on shapes you draw, or even text. If you feather a circle, it becomes a glowing orb. Feather a rectangle? That’s a vintage photo corner. You can make things look old-timey, romantic, or just super artsy.
Want to create a vignette (that dark, moody frame around photos)? Make a large elliptical selection around the center, feather it by 100 pixels, then press Ctrl+Shift+I to invert the selection, and fill it with black. Boom. Instant movie poster vibes.
 How to Feather Edges in Photoshop: Soften & Blend Selections
And if you’re working on a portrait, feather the edges of the background layer to make it look like your subject is melting into the scene. Sweet, sweet visual butter.
The One Thing You Must Remember
Feather affects the selection, not the image itself. Until you actually delete, copy, or fill that selection, everything looks normal. So don’t panic if the edges don’t instantly change. They’re just waiting for you to take action. Think of it as a polite, patient puppy.
Also, if you use the Refine Edge Brush Tool for hair or fur, you can combine it with feathering for magic that borders on illegal. But let’s not get too crazy your first time. Baby steps, my friend.
You’ve Got This (Seriously)
Feathering is one of those things that separates “I use Photoshop” from “I know Photoshop.” And guess what? Now you know it. It’s tiny, it’s simple, and it makes everything look professional. You’ll start noticing soft edges in photos, movies, and even your cereal box.
So go ahead—open a photo, make a selection, and give it a feather. Mess up. Laugh at yourself. Try again. That’s the whole point. The only wrong way to use feathering is not using it at all. And besides, if you totally botch it?
Ctrl+Z is your undo button. And your therapist. And your best friend.
Go forth, feather fearlessly, and let your edges be as soft as your heart. You’re officially a Photoshop legend now. Just don’t forget to save your work. (I’m looking at you, the person who never saves.)
